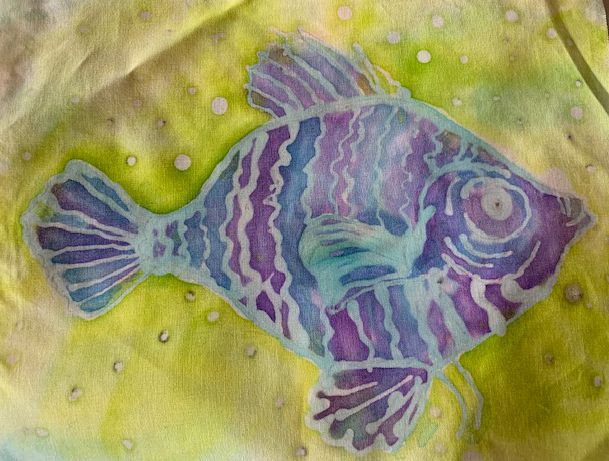
Beth quilted this and then painted it with watercolor paints.
Showing posts with label Dolls. Show all posts
Sunday, February 24, 2019
Beth Sherman Day On Today's Blog
This is the Pinnochio doll Beth recently made.
This was done with soy wax and painted. Beth always has a lot of new work. She loves to try to processes and new products.
Wednesday, February 7, 2018
Kay, The Quilter Is A Real Doll!
A few days ago Jamie Fingal posted a picture of a doll made in her likeness on Facebook.
This one was made in my likeness years ago by Delores Jacobs. I love her.
I have several of her other dolls and Santa’s.
For this one I supplied the dress fabrics and the piece of tatted antique lace.
I have always intended to make a real pieced miniature quilt to put in her hoop.
At the time my hair was red….and I still am a red head at heart!
I never intended to collect dolls, but there are so many art dolls that have spoke to me and I had to have them.
Saturday, October 26, 2013
Book Club Meeting In My Studio Today
Saturday, April 2, 2011
A Spring Tea Party With Some Favorite Doll Collections

This collection of antique dolls was very impressive. I wonder if any of them have been passed down from family?
They range from the 1800's to the 1920's.

I was also impressed with this collection. Many of these dolls are sewing.

I adore this buggy that this lovely baby doll gets to be taken for a ride in.

I think this is clever - a table centerpiece with the doll having her own tea party!
I hope you have enjoyed the Doll Tea Party posts. Please take my word for this: There were many others equally as beautiful. Unfortunately when I need them, sometimes my photography skills are lacking.
Friday, April 1, 2011
A Spring Tea Party With Some Favorite Dolls - The Brides
I think one doll ever little girl wants is a bride doll.
This was something I had forgotten about until I saw the display.
There were some gorgeous ones at the Tea.

These are a just a few of the bride dolls on display at the Tea.

What a lovely delicate bride. I wonder if some of these bride dolls are miniature versions of the owners in their dresses?

Imagine yourself as a little girl waking up Christmas morning and finding this doll under the tree for you. That is something you would never forget and treasure for the rest of your life.

This could be the bride or a bridesmaid. Whichever she is she is stunning and very sophisticated.

Elaine was a cochairman for the show. Her vest made from vintage linens is so feminine and awesome.
This was something I had forgotten about until I saw the display.
There were some gorgeous ones at the Tea.

These are a just a few of the bride dolls on display at the Tea.

What a lovely delicate bride. I wonder if some of these bride dolls are miniature versions of the owners in their dresses?

Imagine yourself as a little girl waking up Christmas morning and finding this doll under the tree for you. That is something you would never forget and treasure for the rest of your life.

This could be the bride or a bridesmaid. Whichever she is she is stunning and very sophisticated.

Elaine was a cochairman for the show. Her vest made from vintage linens is so feminine and awesome.
Thursday, March 31, 2011
A Spring Tea Party With Some Favorite Dolls - Remember Story Book Dolls?

My friend Beth featured her story book dolls on her table. I am not sure if she calls them story book dolls, but to me as a child that is what we called them. I envied my friends who had a collection of them.

This doll has her original dress crocheted in maybe the 1950's. What a treasure to still have.

Beth recently crocheted the dress and hat for this doll. It is just lovely.

If this doll isn't a breath of spring, I don't know what is. She models another one of Beth's recent creations.

I can't begin to imagine the amount of time Beth spent crocheting this one. It is amazing and so Southern Belle!

This is an overview of the dolls on display in the stage area. In a future post you will get to see some of them close up.
Wednesday, March 30, 2011
A Spring Tea Party With Some Favorite Dolls

We have so many lovely creative women in our community. These are three of them.
Again, the ladies out did themselves with the Doll's Tea Party.

An elegant setting befitting this lovely bride doll.

I am going to share some of the table settings with you. They were all absolutely lovely. I did a better job photographing some of them and those are the ones you'll see!

I love the way this lady has mixed the depression glass with her china. There are so many other things I also love about this table.

I would guess this was a much loved and carefully treated doll from childhood. What a great combination of the plates, silverware and other items for an attractive table setting.
I have so much more to share so stay tuned for future posts.
While you are waiting think about getting out your best dishes, something to decorate the table and invite your friends over for a spring tea or lunch. You'll enjoy it and so will they.
Sunday, March 27, 2011
Focus On Fiber Retreat -Part 10 - Underpainting, Dye Rags and Dolls


I did some underpainting on these pieces of fabric.
This is a technique I learned years ago from Jan Myers Newbury.
You paint the fabric with dye concentrates but do not add soda ash and let it dry.
After letting it dry you do a second dyeing with a dark color. I will use a shibori technique - pole wrapping or some other manipulation. The underpainting forms a pattern in the background of the second technique you have done. The resulting fabric has texture and depth that you could not have achieved any other way.

Rather than use paper towels to wipe up spills and clean you tools, it makes sense to use a piece of fabric. This is the piece I used in this class. Usually I continue to use the same piece for several dyeing sessions and get some gorgeous unexpected results.

The markings on this dye rag are fantastic. I want to save them as is. Possibly I will paint this piece of fabric with a solution of soda ash and let it batch. I am not sure if this will allow the markings to remain as distinct as they are.
As I was typing this I had another idea. I may just possibly frame this in a frame I bought yesterday. Time will tell!
And then it was time for moving around again inspired by Linda!

Yes, the group moved right into the other studio where Kathie Briggs was teaching a doll class. That is Kathie at the far left.

These are the parts of a doll being created by one of Kathie's students.

This is another work in progress being created by a student. She had so many fantastic fabrics to draw from.

Another fantastic doll!

Here you get to see two dolls.
It is quite evident Kathie had a very talented group of students, and it is also evident Kathie is a master teacher.
This concludes my coverage of Focus on Fiber. The actual retreat portion ends today so it is only fitting I am ending my coverage of it today.
Thanks to Mary McBride for making this retreat possible and thanks to Linda Dawson for an exceptional class.
Thanks also to the other students in the class for being such a great fun and creative group.
I hope to see you "Same Time Next Year"!
Labels:
Dolls,
Dyeing,
Focus On Fiber,
hand dyed fabric
Wednesday, January 6, 2010
Studio - Rerun 5...and there is still more to come
I have made progress in getting my studio in much better shape.
I still would be embarassed to take a overall shot but I have several vignettes of various areas to show you.

Quilting Grannie has a new home on top of my thread cabinet. She looks much happier surrounded by all the miniature quilts which are in proportion to her size!

In response to previous posts I have been corresponding with other quilters about their fabric storage. One thing that is a concern to all is protecting our fabric from fading. My system involves my movable design wall to keep the fabric from fading. Since this is not a practical solution for most of you I have another suggestion for anyone who stores their fabric on open shelves.
These are my "Messy" bookcases. The ones you saw some time ago were my "Neat" ones in case you didn't figure that out!
I purchased spring loaded tension curtain rods and felt to cover the front of the bookcases. I also did the same with the opening to the store room in the center which does not have a door. I just cut the felt to fit the width, sewed a casing on top and adjusted the curtain rods to fit inside the space. I also have used the felt "curtains" to pin some of my quilts to for display purposes. You could use any fabric to make a "curtain" for open shelves.. I also have used this system to display quilts that hide some "messy" cabinets in the bedrooms.

After visiting other blogs and seeing sketch books ready to use I decided it was time to clear off the drafting table and set up a sketching area. I have started to use this area.

I love these plastic storage drawer units. This particular bank of them is under one end of my cutting table. You can take them apart and put them together to make them whatever height you want. This group holds my polymer clay supplies.
Since I am "Licensed To Quilt" I put a license plate in the front of each drawer in the cabinet that holds my large cones of thread. Do you see any difference between these license plates?
This doll was made by Delores Jacobs from Illinois. You have previously seen some of her limited edition Santa's on my blog. I provided the fabrics and lace for her to make this for me and she obliged with red hair which I had at the time - just not quite that bright. I call her "Kay, The Quilter". She is now back on top of the messy bookcase with The Bride and Miss Liberty.
I still would be embarassed to take a overall shot but I have several vignettes of various areas to show you.

Quilting Grannie has a new home on top of my thread cabinet. She looks much happier surrounded by all the miniature quilts which are in proportion to her size!

In response to previous posts I have been corresponding with other quilters about their fabric storage. One thing that is a concern to all is protecting our fabric from fading. My system involves my movable design wall to keep the fabric from fading. Since this is not a practical solution for most of you I have another suggestion for anyone who stores their fabric on open shelves.
These are my "Messy" bookcases. The ones you saw some time ago were my "Neat" ones in case you didn't figure that out!
I purchased spring loaded tension curtain rods and felt to cover the front of the bookcases. I also did the same with the opening to the store room in the center which does not have a door. I just cut the felt to fit the width, sewed a casing on top and adjusted the curtain rods to fit inside the space. I also have used the felt "curtains" to pin some of my quilts to for display purposes. You could use any fabric to make a "curtain" for open shelves.. I also have used this system to display quilts that hide some "messy" cabinets in the bedrooms.

After visiting other blogs and seeing sketch books ready to use I decided it was time to clear off the drafting table and set up a sketching area. I have started to use this area.

I love these plastic storage drawer units. This particular bank of them is under one end of my cutting table. You can take them apart and put them together to make them whatever height you want. This group holds my polymer clay supplies.
Since I am "Licensed To Quilt" I put a license plate in the front of each drawer in the cabinet that holds my large cones of thread. Do you see any difference between these license plates?
This doll was made by Delores Jacobs from Illinois. You have previously seen some of her limited edition Santa's on my blog. I provided the fabrics and lace for her to make this for me and she obliged with red hair which I had at the time - just not quite that bright. I call her "Kay, The Quilter". She is now back on top of the messy bookcase with The Bride and Miss Liberty.
Thursday, January 29, 2009
Thursday: Jinny Beyer workshops and Show and Tell

I took a class on making a doll pin from Andrea Perkins one year. I'm not a doll maker but Andrea's classes were too much fun so I took several from her. This is Violet. Of course Andrea also tells stories about the dolls.
This is Violet's story. Violet is from Wisconsin. Wisconsin's state flower is the violet so that is why she always wears that leather violet pin on her hat. Her hat is made from a piece of decorator fabric Kay purchased on one of her shopping expeditions earlier in the week and from a sample of Jinny Beyer fabric chosen to match her pin. She thinks the beaded feathers under her chin are so fashionable, even if they do tickle her when she moves the wrong way. She was so happy to be created in a class taught by Andrea as Andrea is originally from Wisconsin and Kay also lives in Wisconsin.

This large block is a work in progress started in one of the early Jinny Beyer seminars. My intentions are to add one or more borders to finish it. At one time I had planned on making it much larger. It certainly doesn't need to be much bigger than it is now.

I designed and made these blocks one year when the seminar theme was Medallion Quilts. I intended to make this a king size quilt to fit our bed. At the time I started this I thought all my quilts should be king size quilts! How many king size quilts does one family need? I have a basic layout sketched to make this. I will be scaling this back and making a generous size wall quilt with it. I still love the blocks as much as I did when I originally made them in one of the early seminars. The colors I chose were very unusual at the time. I have learned that these are colors that look good almost anywhere.

This very poor quality photo shows my quilt "Bordering On A New Millennium" being held up on stage for the Thursday evening show and tell of participants quilts. This was shown at the 2000 Seminar. You've seen this quilt on the Anderson Arts Center calendar in a previous post.

Robin Haller has sent me photos of 2 of her quilts. This one is called "Inner City, Outer Space". Robin attended about 10 of Jinny's seminars and you can see this is a wonderful example of things she learned. I'm so pleased to be able to share her quilts with you.

Cosmic Cube is another quilt by Robin. This quilt is a great example of how you can show the third dimension on a flat surface. I love both of her quilts so much. Robin has won a lot of contests with her gorgeous quilts. Robin and I last saw each other at Jinny's 25th Seminar.
Stay tuned as I will share two more posts with you as there are two more days left in Jinny's final Hilton Head Seminar.
Subscribe to:
Posts (Atom)