Showing posts with label Sunrise - Sunset Quilt. Show all posts

Wednesday, January 26, 2022

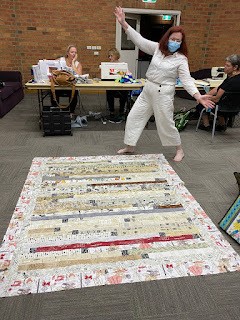
Quilters In Australia Use My Sunrise Sunset Tutorial

 Several years ago a well known quilter in Australia found my tutorial and I had tens of thousands of views from Australia.

My friend Cassandra Philpot made numerous quilts from the tutorial.

Her guild Queanbeyan Quilters recently contacted me and asked to use my tutorial for their activiry session and I gave them permission.

Queanbeyan Quilters Inc.: Racing through those jelly rolls!

You can do a few clicks to see their report.

I have only been able to share a few with my meager computer skills. They really came up with some unique projects.


Tuesday, May 1, 2018

13131 - A Palindromic Number Of Views For My All Time Most Popular Blog Post

This is such a fun quilt to make.
It is one so many of my friends, former students, people from other countries and who knows who else have made.
My sister in law Sue Sorensen had never made a quilt and she was very successful creating this one.

I think my friend Cassandra Philpot in Australia holds the record for making more of them than anyone else.
I love to help people choose the fabric for this one. I actually have a whole box of fabrics cut that I can put kits together for it but haven’t had time to offer them.
SO HERE IT IS –SUNRISE, SUNSET QUILT TUTORIAL - DRUM ROLL PLEASE!

There has been so much interest in this quilt I thought I'd share how I did it with you.
As I said before I got the idea on line somewhere but I don't know where.
That is almost irrelevant as I "did my own thing" - just using the basic idea.
FABRIC REQUIREMENTS
38 different fabric strips. Each one should be 2 1/2 inches wide by the width of the fabric.
An accent fabric - 1/2 yard
SELECTING YOUR FABRICS
I suggest you choose fabrics that have something in common, but still have a variety of light, medium and dark.
I would also suggest you do not chose large prints with a lot of colors in them as they create their own set of design issues. Save them for something else.
TIPS FOR CHOOSING AN ACCENT FABRIC
1. Your accent fabric should contrast with each one of your fabrics. An example of that would be if you choose to use green and blue fabrics for your strips, you might choose pink or red for the accent.
2. It is also a good idea to choose an accent fabric that is more dramatic than the fabrics you chose for you strips.


ARRANGING THE ORDER OF YOUR FABRICS
1. Try to arrange your fabrics so the values and colors are evenly distributed in the order of the strips.
2. You can not preplan what is going to go next to what else so it is important you have kept this in mind when deciding the order of the strips. The finished quilt will be a pleasant surprise if you keep this in mind.
CUTTING
1. Cut a 2 1/2 inch by the width of the fabric strip from each of your fabrics. It is not necessary nor desirable that they each be exactly the same length
2. Cut 38 2 1/2 inch x 4 1/2 inch pieces from your accent fabric.
CONSTRUCTION - NOW THE FUN BEGINS!
You will sew all of the fabrics and spacers together to create one long strip which will measure approximately 1750 inches long.
1. Cut off 18 inches from the first strip and throw it in your scrap bin or the wastebasket. DO NOT USE IT
2. To the end of this first strip sew a spacer.
3. Sew the next long strip to the other end of the spacer.
4. Sew another spacer to the end of this strip.
5. Continue in this manner until you have sewn all the strips and spacers together ending with spacer.


6. Press seams to one side.
CREATING THE QUILT TOP FROM THE ONE LONG STRIP
1. Bring both ends of the strip to meet and place them right sides together.
2. Sew them together and you will now have a piece that is about 875" long.
Cut them apart on the fold at the end of the seam. (Do not press the seam now - You will do that later)
3. Match up both end of your strip and sew them together just as you did the first seam. This time you will only have to sew about 437 inches. Cut open on the seam as you did before.


4. Do the same thing 3 more times for a total of 5 seams. The last one will be about 55 inches.

PRESSING
Now it is time to press all the seams to one side.
I press first from the back with a dry iron.
I turn it over and press carefully from the front with a steam iron, making sure if there are any tucks in my pressing I press them out.
When all the strips have been sewn together I do a row of stitching less than 1/4 inch away from the edge to prevent any stitching that has been cut from coming undone.


All that is left is the quilting and finishing.
BET YOU CAN'T MAKE JUST ONE!

Friday, May 10, 2013

Sunrise - Sunset Quilt Tutorial - Rerun

This blog post has had almost 10,000 views since I posted it a little over 2 years ago.

That means there are still a few people out there who haven’t seen it!

I have lost track of the number of people who have made one of these – and some of you have made a lot of them.

I also call it the Potato Chip quilt since you can’t make just one! It is so much fun and so easy.

How many have you made Cassandra?


There has been so much interest in this quilt I thought I'd share how I did it with you.
As I said before I got the idea on line somewhere but I don't know where.
That is almost irrelevant as I "did my own thing" - just using the basic idea.
FABRIC REQUIREMENTS
38 different fabric strips. Each one should be 2 1/2 inches wide by the width of the fabric.
An accent fabric - 1/2 yard
SELECTING YOUR FABRICS
I suggest you choose fabrics that have something in common, but still have a variety of light, medium and dark.
I would also suggest you do not chose large prints with a lot of colors in them as they create their own set of design issues. Save them for something else.
TIPS FOR CHOOSING AN ACCENT FABRIC
1. Your accent fabric should contrast with each one of your fabrics. An example of that would be if you choose to use green and blue fabrics for your strips, you might choose pink or red for the accent.
2. It is also a good idea to choose an accent fabric that is more dramatic than the fabrics you chose for you strips.

ARRANGING THE ORDER OF YOUR FABRICS
1. Try to arrange your fabrics so the values and colors are evenly distributed in the order of the strips.
2. You can not preplan what is going to go next to what else so it is important you have kept this in mind when deciding the order of the strips. The finished quilt will be a pleasant surprise if you keep this in mind.
CUTTING
1. Cut a 2 1/2 inch by the width of the fabric strip from each of your fabrics. It is not necessary nor desirable that they each be exactly the same length
2. Cut 38 2 1/2 inch x 4 1/2 inch pieces from your accent fabric.
CONSTRUCTION - NOW THE FUN BEGINS!
You will sew all of the fabrics and spacers together to create one long strip which will measure approximately 1750 inches long.
1. Cut off 18 inches from the first strip and throw it in your scrap bin or the wastebasket. DO NOT USE IT
2. To the end of this first strip sew a spacer.
3. Sew the next long strip to the other end of the spacer.
4. Sew another spacer to the end of this strip.
5. Continue in this manner until you have sewn all the strips and spacers together ending with spacer.

6. Press seams to one side.
CREATING THE QUILT TOP FROM THE ONE LONG STRIP
1. Bring both ends of the strip to meet and place them right sides together.
2. Sew them together and you will now have a piece that is about 875" long.
Cut them apart on the fold at the end of the seam. (Do not press the seam now - You will do that later)
3. Match up both end of your strip and sew them together just as you did the first seam. This time you will only have to sew about 437 inches. Cut open on the seam as you did before.


4. Do the same thing 3 more times for a total of 5 seams. The last one will be about 55 inches.

PRESSING
Now it is time to press all the seams to one side.
I press first from the back with a dry iron.
I turn it over and press carefully from the front with a steam iron, making sure if there are any tucks in my pressing I press them out.
When all the strips have been sewn together I do a row of stitching less than 1/4 inch away from the edge to prevent any stitching that has been cut from coming undone.

All that is left is the quilting and finishing.
BET YOU CAN'T MAKE JUST ONE!

Saturday, April 23, 2011

Sunrise - Sunset Quilt -Quilting Is Finished


I made some time today to finish quilting my Sunrise-Sunset Potato Chip quilt today.

There was a very good craft fair not far from here and I had planned to go. Then I said to myself "Kay, you certainly don't need to buy anything. Kay, you don't need any more inspiration for your art. Kay, you don't really want to fight the crowds after you spend too long looking for a place to park. Kay, you really don't enjoy being outside in 90 degree weather."

I think when I got to the 90 degrees I knew I'd be happier home in the AC!.

I alternated quilting with other activities that are not as enjoyable - laundry, loading the dishwasher, straightening the house, putting things away and working on my eBay auctions. OK - I admit I also spent a little time on the computer.


But, the quilting is done. I have left this photo super large so you can click on it and see the quilting up close and personal!

The only thing left to do is trim the edges to square it up, bind it, add a casing to the back and sign it.

I have been facing most of my quilts but binding is the best finish for this one. I do a great job binding a quilt, and it sure is quicker than facing!

Tuesday, April 12, 2011

Sunrise - Sunset Quilt Tutorial


There has been so much interest in this quilt I thought I'd share how I did it with you.
As I said before I got the idea on line somewhere but I don't know where.
That is almost irrelevant as I "did my own thing" - just using the basic idea.

FABRIC REQUIREMENTS
38 different fabric strips. Each one should be 2 1/2 inches wide by the width of the fabric.
An accent fabric - 1/2 yard

SELECTING YOUR FABRICS
I suggest you choose fabrics that have something in common, but still have a variety of light, medium and dark.
I would also suggest you do not chose large prints with a lot of colors in them as they create their own set of design issues. Save them for something else.

TIPS FOR CHOOSING AN ACCENT FABRIC
1. Your accent fabric should contrast with each one of your fabrics. An example of that would be if you choose to use green and blue fabrics for your strips, you might choose pink or red for the accent.
2. It is also a good idea to choose an accent fabric that is more dramatic than the fabrics you chose for you strips.


ARRANGING THE ORDER OF YOUR FABRICS
1. Try to arrange your fabrics so the values and colors are evenly distributed in the order of the strips.
2. You can not preplan what is going to go next to what else so it is important you have kept this in mind when deciding the order of the strips. The finished quilt will be a pleasant surprise if you keep this in mind.

CUTTING
1. Cut a 2 1/2 inch by the width of the fabric strip from each of your fabrics. It is not necessary nor desirable that they each be exactly the same length
2. Cut 38 2 1/2 inch x 4 1/2 inch pieces from your accent fabric.

CONSTRUCTION - NOW THE FUN BEGINS!
You will sew all of the fabrics and spacers together to create one long strip which will measure approximately 1750 inches long.

1. Cut off 18 inches from the first strip and throw it in your scrap bin or the wastebasket. DO NOT USE IT

2. To the end of this first strip sew a spacer.

3. Sew the next long strip to the other end of the spacer.

4. Sew another spacer to the end of this strip.

5. Continue in this manner until you have sewn all the strips and spacers together ending with spacer.


6. Press seams to one side.


CREATING THE QUILT TOP FROM THE ONE LONG STRIP

1. Bring both ends of the strip to meet and place them right sides together.

2. Sew them together and you will now have a piece that is about 875" long.
Cut them apart on the fold at the end of the seam. (Do not press the seam now - You will do that later)

3. Match up both end of your strip and sew them together just as you did the first seam. This time you will only have to sew about 437 inches. Cut open on the seam as you did before.


4. Do the same thing 3 more times for a total of 5 seams. The last one will be about 55 inches.


PRESSING
Now it is time to press all the seams to one side.
I press first from the back with a dry iron.
I turn it over and press carefully from the front with a steam iron, making sure if there are any tucks in my pressing I press them out.

When all the strips have been sewn together I do a row of stitching less than 1/4 inch away from the edge to prevent any stitching that has been cut from coming undone.


All that is left is the quilting and finishing.

BET YOU CAN'T MAKE JUST ONE!